
BOM Number
Overview
BOM Number is used to assign mark numbers and/or part numbers to components. You can choose to assign the mark numbers to the Inventor Item numbers in the Bill of Material, assign them to a custom iProperty (storing part numbers in the component files), assign numbering to each component part number, or set all of the above.
The choice between options for assigning mark numbers depends on how you want to use your Bill of Material. For example, if all BOM items are local to a system, assign mark numbers to the Item Number (stored in the assembly file BOM and inaccessible from other assemblies). If you want to combine common mark numbers across assemblies, assign them to a Custom iProperty and use a master BOM file.
In both cases, it is a good idea to lock all items in the Bill of Material so you don’t accidentally renumber them after they have been submitted for construction.
When numbering items, you choose a BOM view, select the first and last row for numbering, and set a prefix and starting index for each item. Purchased equipment and normal components are handled separately, with separate prefixes and starting indexes.
How It Works
- Select the BOM view (Structured or Parts Only).
- Choose the numbering method: Item, Custom, Part Number, or All.
- Set prefixes, starting indexes, and number of digits for part numbers and PE numbers.
- Specify the first and last rows to update in the BOM.
- Optionally, use a BOM configuration XML file for custom settings.
- Run the command to assign numbers and update the BOM.
Usage Instructions
- Open the target assembly and BOM.
- Click the BOM Number button in the Configure panel.
- Fill in the dialog box: select BOM view, set numbering options, prefixes, indexes, and rows to update.
- Click OK to assign numbers and update the BOM.
Troubleshooting
- If numbers are not assigned, check BOM view and row selection.
- Ensure prefixes and index values are correct.
- Lock the BOM after numbering to prevent accidental changes.
Examples
- Assign mark numbers to all BOM items: Use Item Numbering to number every item in the BOM.
- Assign numbers to common components: Use Custom iProperty and a master BOM file to combine mark numbers across assemblies.
- Update only a range of BOM rows: Set First Row and Last Row to limit numbering to a specific range.
Dialog Box Input
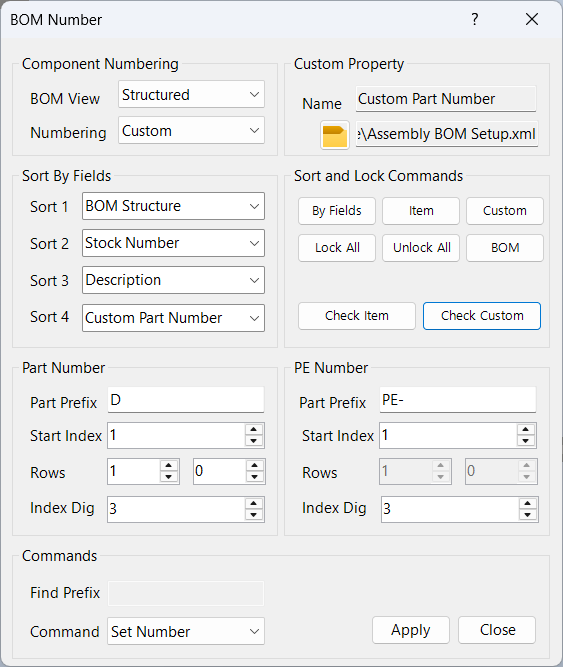
Component Numbering
BOM View: Select the Bill of Material view to modify. Options are Structured or Parts Only.
Numbering: Choose where to apply mark numbering: Item (Inventor BOM Item numbers), Custom (custom iProperty in each component), Part Number (component part number), or All (apply to all options).
Custom Property
Custom Name: The custom iProperty name used to store custom part numbers. Set this with the Custom Part Number Name command.
BOM Configuration File: An XML file containing custom settings for the BOM view. Import this file to apply custom BOM columns and row merge settings. Leave blank to use the BOM as is.
Sorting
Sort By 1-4: Set up to four sort keys for BOM sorting. If Sort By 4 is set, sorting is performed by keys 1-3, then by key 4.
Sort and Lock/Check
Use the buttons in this section to sort, lock, unlock, and open the BOM.
Check Item and Check Custom commands Check and verify that all components with matching part numbers share the same item number (or custom number), and ensure that no item number (or custom number) is duplicated in the BOM.
Part Number
Part Prefix: Prefix text before the index portion of the part number. Optional.
Start Index: The starting numeric value for part numbers. Increments for each assignment.
Index Digits: Number of digits in the part number index.
PE Number
PE Prefix: Prefix text before the index portion of the PE part number. Optional.
Start Index: The starting numeric value for PE part numbers. Increments for each assignment.
Index Digits: Number of digits in the PE part number index.
Rows to Update
First Row: The first BOM entry to modify.
Last Row: The last BOM entry to modify. Set to 0 to update all rows to the end of the BOM.
Note, the PE Rows are duplicates of the Part Number rows and are for reference only.
Commands
Set Number: Assigns a new number by combining the part prefix and part index.
Update Prefix: Assigns a new prefix to the part, replacing the old prefix if present.
Delete Prefix: Removes the prefix, if any, from the part number.
Replace Prefix: Replaces the existing prefix with the new prefix, only if the existing prefix matches Old Prefix.